Installation
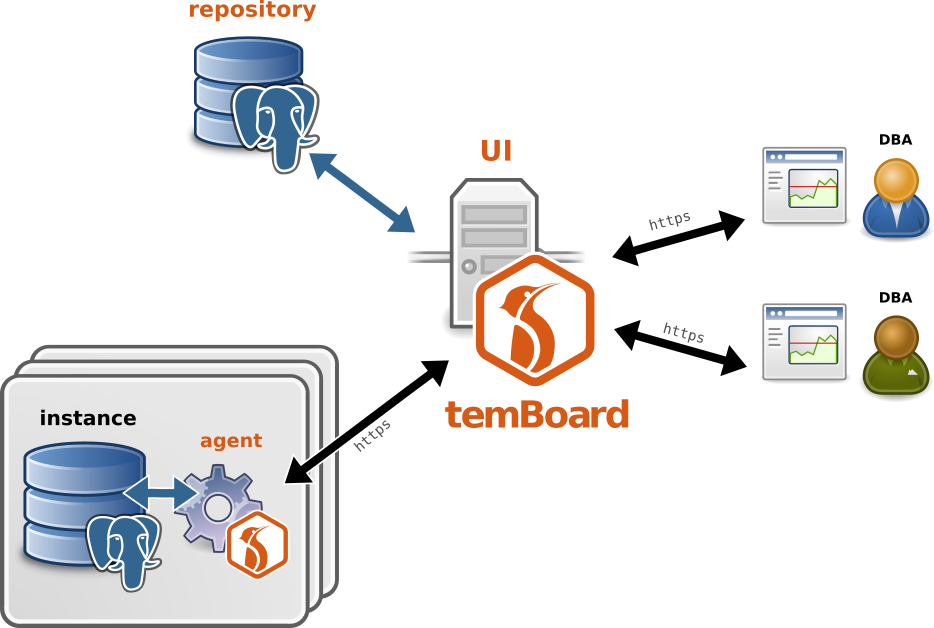
temBoard is designed with three distinct components:
- repository - a Postgres database to store users, instances list and monitoring data.
- UI - the main web interface.
- agent - a standalone daemon attached to a single Postgres cluster to manage.
The following diagram illustrates the global architecture of temBoard.
This document guides you to quickly setup all these components together.
Prerequisites
temBoard UI requires:
- Python 2.7 or 3.6
- openssl
- bash, sudo and psql for setup script.
Prepare repository
Before installing temBoard UI, ensure you have a running PostgreSQL 9.5+
cluster. The auto-configuration script works well with a local Postgres cluster,
running as UNIX user postgres. If it's not the case, post-inst script will
fail gracefully and let you handle the configuration later.
Note
To ensure browsing of the web interface is fast enough, please note work_mem
parameter PostgreSQL cluster hosting the repository should be set to at least
16MB.
A simple way to check if auto configuration should work is to run:
# sudo -u postgres psql
If this fails, don't worry. You will have to run auto-configuration script with proper parameters, once temBoard package is installed.
Installation
Choose the method matching your target system:
Debian
temBoard debs are published on Dalibo Labs APT repository. temBoard supports Debian buster and stretch. Start by enabling Dalibo Labs APT repository.
# echo deb http://apt.dalibo.org/labs $(lsb_release -cs)-dalibo main > /etc/apt/sources.list.d/dalibo-labs.list
# curl https://apt.dalibo.org/labs/debian-dalibo.asc | apt-key add -
# apt update -y
You can now install temBoard with:
# apt install temboard
# temboard --version
RHEL / CentOS / RockyLinux / ...
temBoard RPM are published on Dalibo Labs YUM repository. temBoard supports RHEL / CentOS 7 & 8. Start by enabling Dalibo Labs YUM repository.
$ sudo yum install -y https://yum.dalibo.org/labs/dalibo-labs-3-1.noarch.rpm
$ sudo yum makecache fast
Warning
Do NOT use temBoard rpm from PGDG. They are known to be broken.
Warning
Ensure you have updated dalibo labs repo pointing to yum.dalibo.org/labs/RHEL directory, not yum.dalibo.org/labs/CentOS.
With the YUM repository configured, you can install temBoard UI with:
$ sudo yum install temboard
$ temboard --version
Offline install
Some production infrastructure are offline for security reasons. In this situation, the temboard package and its dependencies can be dowloaded with the following commands :
$ sudo yum install yum-utils
$ yumdownloader --resolve --destdir /tmp/temboard-packages temboard
Then the downloaded packages can be transfered to the production server and installed with
$ yum --disablerepo=* localinstall *.rpm
PyPI
temBoard UI wheel and source tarball are published on PyPI. Installing from PyPI requires Python2.7, pip and wheel. It's better to have a recent version of pip.
Due to the binary strategy of
psycopg2
project, you have to choose how to install psycopg2: either from source (using
psycopg2 package) or from binary (using psycopg2-binary package). You can
also use distribution package instead.
$ sudo pip install temboard psycopg2-binary
$ temboard --version
temBoard installation prefix
temBoard installation prefix may differ from one system to another, e.g. /usr
or /usr/local. Please adapt the documentation to match this system prefix.
Now run manually the auto configuration script:
$ sudo /usr/local/share/temboard/auto_configure.sh
Post installation
If postinst auto-configuration fails, you can still relaunch it with proper
parameters. Call the script /usr/share/temboard/auto_configure.sh with
libpq-style envvars (eg. sudo PGPORT=5433 /usr/share/temboard/auto_configure.sh).
The postinst script creates Postgres role, database and tables, as well as self-signed SSL certificate, UNIX user, configuration file and systemd unit. A few steps are left to the administrator.
The configuration file /etc/temboard/temboard.conf should suit most people.
See Configuration and customize if default port
or directories don't match your local needs, or increase security by changing
the certificate and the cookie secret key.
Default admin user
By default, temBoard is set up with a dumb admin user with password admin. This
is totally unsecured. It is strongly recommended to change default password! See below.
First, start temboard using systemctl start temboard.
Then point your browser to https://temboard_server_host:8888, log in as
admin:admin and change the password.
Using firewall
To increase security, you may protect temBoard using a firewall rule, until the quickstart admin is secured.
Install agents
Once the UI is up and running, you can proceed to agent installation and setup on each host you want to manage. See the dedicated agent installation documentation for this.
Then, when all instances show up in temBoard, go further with the How to.